Backyard & Garden Shop the Room!

Patio Goals: How the Alizé Umbrella Turned My Backyard Into a Retreat

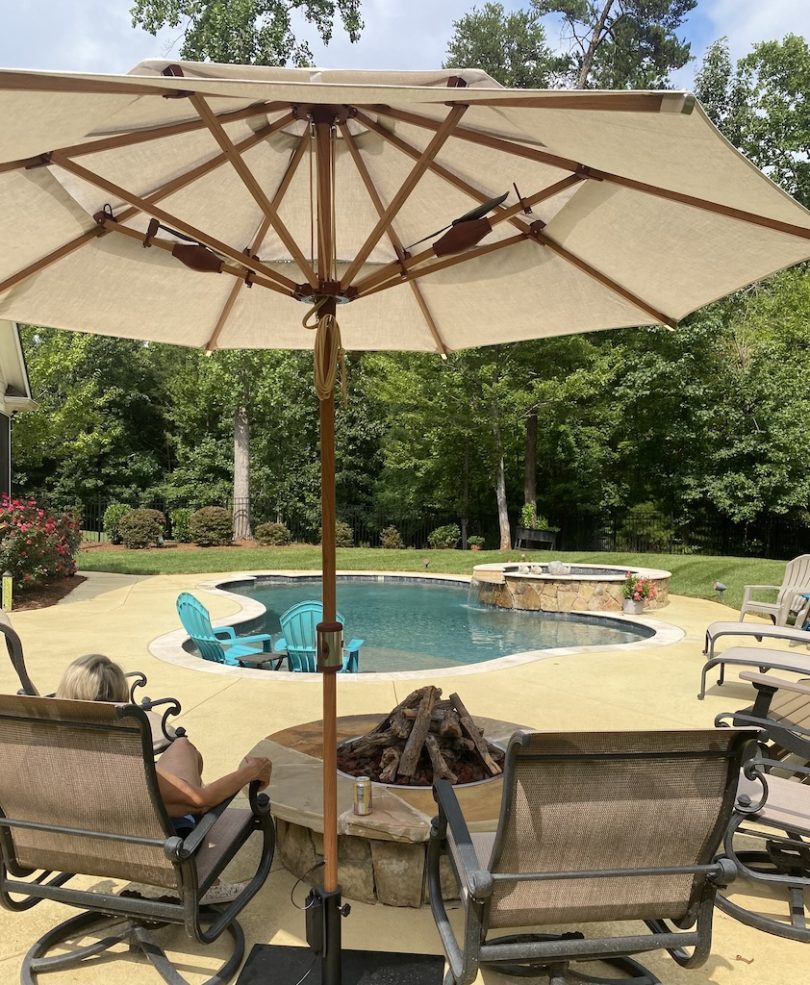
I’ve always loved spending time outside, but between the blazing sun and still summer air, my patio often felt more like an oven than an oasis. That changed the day I discovered the Alizé Umbrella — a smart, stylish upgrade that completely redefined what outdoor comfort means.

The Smart Shade That Does It All

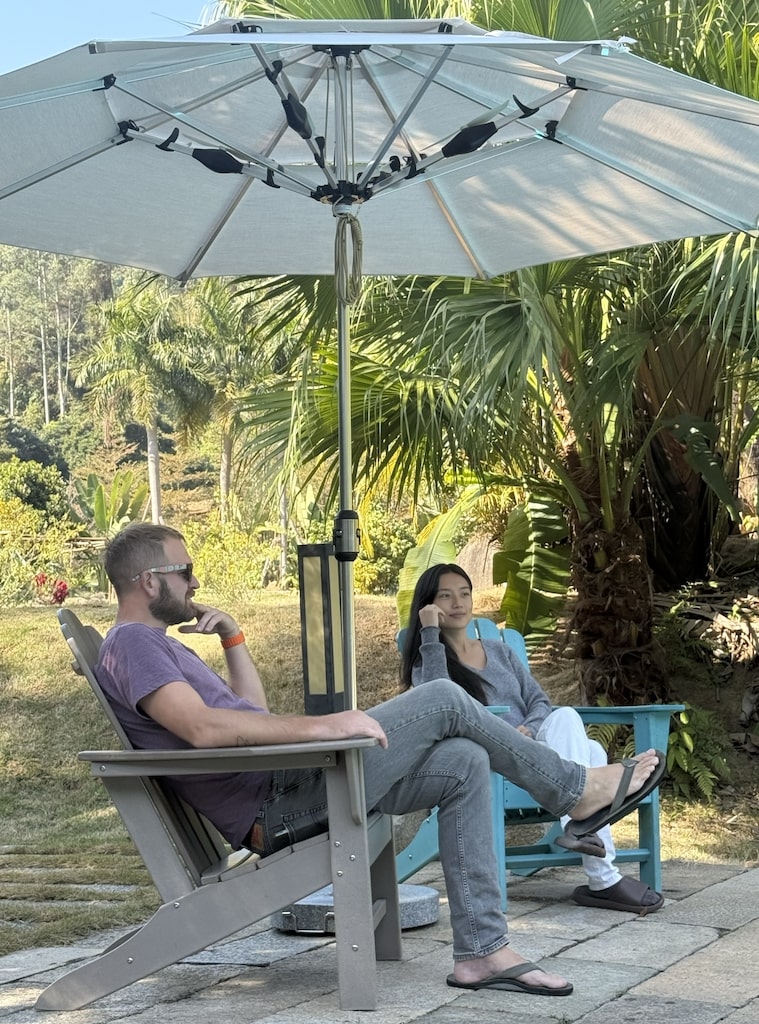
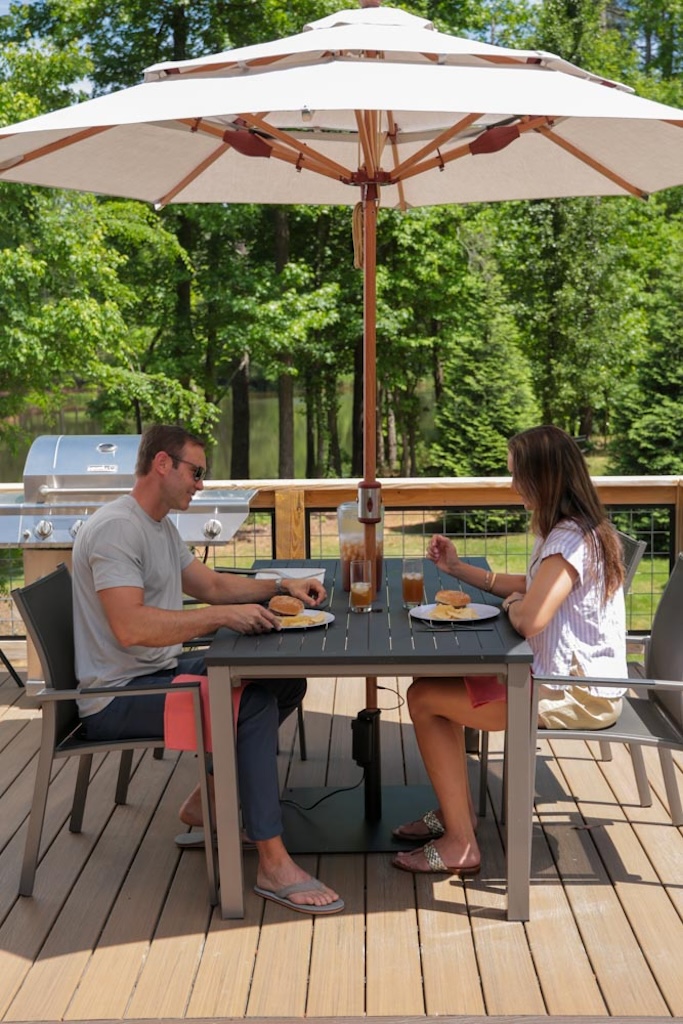
The first thing you notice about the Alizé Umbrella is that it’s not your typical patio shade. It’s actually the first fan-integrated patio umbrella — engineered to give you both cool shade and a refreshing breeze at the same time. Instead of just blocking the sun, it brings real airflow right where you need it.

With dual brushless DC fans that quietly circulate up to 4,200 CFM of air, it creates a calm, steady breeze that feels like sitting seaside, even on the stillest days. What really impressed me is how whisper-quiet the fans are — you can feel the airflow but barely hear a thing. It’s all controlled with simple push-button operation, which makes it totally seamless and cordless. And since it even includes built-in USB ports, I can keep my phone or tablet charged while relaxing — no extension cords, no extra gadgets cluttering the patio.

Built for Real Weather, Not Just Nice Days

It’s easy to fall for a beautiful design, but the Alizé Umbrella isn’t just about looks — it’s built to last. Every part of it feels solid and thoughtfully made. The umbrella is wind tunnel tested up to 41 MPH, which gave me peace of mind knowing it can handle those unexpected summer gusts.

The frame is made from premium marine-grade aluminum, the hardware is stainless steel, and the canopy fabric is Olefin — a durable, weatherproof and fade-resistant material that also provides UPF 50+ UV protection. After leaving it open for weeks in the sun, it still looks brand new. It’s clear that this thing was designed for the real outdoors, not just perfect-weather afternoons.

And there’s a story behind that level of craftsmanship — the umbrella was designed by a former sailor inspired by Caribbean trade winds, which explains why every detail feels engineered for both beauty and endurance.

Coastal Style With Timeless Appeal

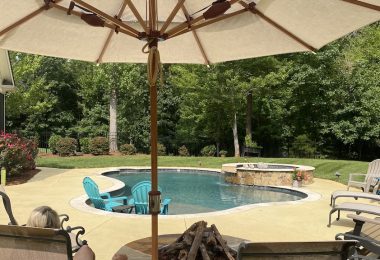
I’m a big believer that your outdoor space should feel like an extension of your home — and the Alizé Umbrella delivers that effortlessly. The design is clean and modern, but with a hint of coastal charm. The finishes are Caribbean-inspired, available in gorgeous tones like Cast Mist and Sandstone, which fit perfectly with natural stone, wood, or even modern concrete patios.

When I set mine up by the pool, the difference was instant. The soft color, the subtle lines, and that gentle breeze gave the whole space a resort-like vibe. It felt less like my backyard and more like a private retreat. Whether it’s open over my lounge chairs or shading my outdoor dining area, it adds that finished look that makes guests stop and say, “Wow, where did you get that?”

Effortless Comfort, Every Day

One of my favorite things about the Alizé Umbrella is how easy it is to live with. There’s no setup hassle — the fans and shade are fully integrated, so you just open it, press a button, and enjoy. No separate fan to assemble, no cords to hide, and no maintenance headaches.

It’s perfect for lazy weekend mornings with coffee, family pool days, or even evenings with friends. Having that gentle breeze overhead keeps everyone comfortable, and the built-in charging ports are a small but brilliant touch for keeping devices powered while we hang out.

A New Standard for Outdoor Living

It’s no surprise that Alizé literally means “the breeze” — it captures exactly what this umbrella delivers. The Alizé Umbrella combines smart technology, thoughtful design, and durable craftsmanship to create a whole new level of outdoor comfort.

If you’ve ever dreamed of turning your patio into a peaceful retreat — the kind of space where you can relax, recharge, and entertain in comfort — this is the upgrade that makes it happen. For me, it’s not just an umbrella anymore; it’s the heart of my backyard. And once you’ve experienced that built-in breeze, you’ll never look at shade the same way again.

Read more
Decorating ideas Shop the Room!

Minimalist Thanksgiving Decor Ideas for a Classy Celebration

Thanksgiving is more than just a feast—it’s a reflection of warmth, gratitude, and connection!

This year, the trend toward simplicity and mindfulness has made minimalist decor a favorite among hosts seeking a more refined, intentional holiday atmosphere. By focusing on neutral palettes, natural materials, and meaningful details, you can create a stunning Thanksgiving setting that radiates calm sophistication without clutter or overwhelm.

Here’s how to design a minimalist Thanksgiving celebration that feels effortlessly elegant—complete with ideas for the table, home accents, and ambient touches.

Start with a Soft, Natural Palette

Minimalism thrives on simplicity and harmony. Instead of overwhelming the eye with layers of bright orange and gold, opt for muted tones inspired by nature—soft whites, beiges, taupes, tan, and sage. Mix textures over colors: think raw linen napkins, smooth ceramic dishware, and matte serving bowls.

Natural elements are the cornerstone of minimalist Thanksgiving decor. Combine wooden chargers, stone platters, and neutral linens to build a grounded tablescape. For an inviting touch, layer a woven throw or accent pillows onto dining chairs. A piece like this jute pillow from Crane Home adds subtle texture and embodies the earthy calm that defines minimalist style.

Elevate the Table with Understated Elegance

A minimalist Thanksgiving table doesn’t need elaborate centerpieces to feel festive. Instead, choose one focal point that makes an impact. A single vase filled with seasonal greenery—such as eucalyptus, dried wheat, or olive branches—creates height and draws the eye naturally.

Trade large florals or pumpkins for smaller accents: mini gourds in neutral tones, votive candles in glass holders, or handcrafted ceramic bowls filled with pears or pinecones. Cluster items in odd numbers and keep surfaces visible between decor pieces to maintain a feeling of openness.

For an ultra-polished touch, use a neutral or wood-toned table runner instead of a full tablecloth. Exposed tabletops made of wood, stone, or even concrete reflect minimalist authenticity.

Play with Light and Warmth

Lighting sets the tone for your Thanksgiving celebration, especially as daylight fades earlier in the season. Soft, ambient lighting makes minimalist spaces come alive. Replace bright overhead lights with a mix of candlelight and low, warm-toned lamps.

Tall taper candles placed symmetrically down the center of the table add a golden glow and instant sophistication. For a modern twist, place candles at varying heights or use sleek black holders for contrast against white or beige linens. Dim lighting also helps metallics—like gold or copper accents—glisten subtly, adding depth without excess.

Choose Quality Over Quantity

Minimalist Thanksgiving decorating is about intentional choices. Rather than crowding your home with themed trinkets, focus on a few timeless, high-quality pieces that can transition easily into winter. For example, rather than filling vases with faux leaves, try a simple bouquet of fresh seasonal stems that can later complement your holiday decor. Simple elements like matte-finish plates, neutral cloth napkins, and simple name cards tied with twine or dried herbs embody understated luxury. It’s not about having less—it’s about making each item count.

Incorporate Organic Materials

Texture plays a powerful role in minimalist decor, especially when color is kept restrained. Combine organic materials to add depth and warmth. Think jute, linen, wood, clay, and woven fibers. These natural elements create visual interest without feeling “busy.” 

Wicker trays filled with gourds, linen table napkins tied simply with a strand of thread, or a reclaimed wood breadboard layered with fruits and nuts blend rustic elegance with modern simplicity. A textured accent can tie the entire aesthetic together while maintaining a cohesive look throughout dining and living spaces.

Add Personal, Thoughtful Touches

Minimalism doesn’t mean sterile—it means intentional. Thanksgiving thrives on emotional warmth and meaning, which you can reflect through personal details that celebrate gratitude.

Try handwritten name cards listing one thing you’re thankful for about each guest, or place a small card at every seat where invitees can write what they’re grateful for and read aloud during dinner. These moments create connection and align perfectly with the holiday’s purpose—gratitude over grandiosity.

Simplicity also extends to scents. Light a subtle candle with natural notes of wood, vanilla, or cinnamon to create a cozy ambiance without overpowering the meal’s aroma.

Extend the Minimalist Style Beyond the Table

Carry your minimalist aesthetic throughout the home with cohesive, low-key details. A wreath made of dried grasses or eucalyptus above the mantel ties the season’s essence together. On side tables, glass vases, stacked coffee table books in neutral shades, and subtle metallics add structure and charm.

Consider small accents like linen runners, natural woven coasters, or a centerpiece bowl with fresh produce—functional, beautiful, and totally Thanksgiving-appropriate. Minimal holiday decorating also makes for a cleaner, more relaxed hosting experience. A decluttered space fosters a sense of calm for both the host and guests, allowing everyone to savor the season’s spirit.

Why Minimalist Thanksgiving Decor Works

When done thoughtfully, minimalist Thanksgiving decor combines form, function, and emotion. It’s visually restful yet rich in texture, understated yet meaningful. By blending organic materials, neutral palettes, and personal details, you can turn your celebration into an effortlessly stylish event that feels grounded, elegant, and serene.

This holiday, let your decor reflect what Thanksgiving truly stands for—intentionality, gratitude, and connection. With fewer elements and more focus on simple beauty, your minimalist design will not only elevate your dining table but also create a sense of calm warmth that keeps guests lingering long after the last slice of pie.

Read more
Home Maintenance Shop the Room!

How to Repair Minor Damage Before Moving Out of a Rental

If you are moving out of your rental soon, here is how to quickly repair some minor damage the easy way to secure you get your deposit back!

Moving out of a rented home feels like a quiet balancing act between excitement for what comes next and the stress of what’s left behind. There are boxes to fill, cupboards to clear, and that lingering worry about the deposit that could so easily slip away. Taking time to restore the little details you once overlooked can make your farewell both graceful and rewarding.

Understand Why Small Repairs Matter

A home that looks cared for speaks volumes. When the property manager enters and observes neat walls, sturdy handles, and naturally shining floors, it signifies a tenant who has shown respect for the space. Everyday wear is expected, yet scuffed paint, cracked tiles, or broken blinds can give a sense of neglect. Ignoring small damage often costs more later. Landlords may hire expensive contractors and subtract the charges from your deposit, leaving you to pay for work that could’ve been avoided. 

A few minutes spent filling tiny holes or tightening fittings saves far more than it costs. It also sets a good example for future tenants, showing that a rented property deserves the same attention as any owned home. If you ever feel uncertain, look up simple guides or short tutorials. Many community workshops now teach quick fixes, from sealing minor cracks to patching wall paint, and learning such skills can help you keep your living space well-maintained wherever you move next. Knowing how to handle small mends builds quiet confidence that follows you from one tenancy to another, helping you care for each property as though it were your own.

Restore Everyday Wear with Simple Fixes

Every room tells its own story, and small marks often show where life has happened. Rather than seeing them as faults, think of them as reminders that can be gently smoothed away before you hand back the keys.

Start with the walls. Tiny nail holes or faint cracks are easily filled using a small amount of spackling paste. Smooth it with a knife, let it dry fully, and apply a coat of matching paint for a seamless finish. For more noticeable patches, sand the edges lightly first to avoid uneven texture.

Floors deserve similar care. A soft cloth and mild soap will lift most scuff marks from wooden surfaces. Where scratches are deeper, apply a wood-restoring product that blends with the grain. For carpets, gentle dabbing with a solution of white vinegar and warm water works well on stains. If marks persist, booking a trained cleaner is worthwhile, as their equipment reaches deep within the fibres and removes what home vacuums cannot.

Refreshing doorframes, handles, and skirting boards adds the final touch. A single evening devoted to these finishing details transforms tired rooms into spaces that feel newly polished and ready for inspection. Adding a faint touch of polish to wooden trims or handles also helps everything appear brighter without needing a full replacement.

Record and Review the Property’s Condition

Once the repairs are done, take a quiet moment to look around your home. Photograph each room in clear daylight, capturing the condition of the walls, floors, and fittings. These records serve as calm reassurance if a dispute ever arises about your deposit. It’s also wise to arrange a brief walk-through with your landlord or letting agent before the final handover. Addressing concerns together prevents misunderstandings and shows that you’ve handled the process responsibly. 

Keep receipts for any products or small repairs too, as proof of your effort. In some cases, landlords appreciate seeing how you improved the space, which can make them more flexible about minor imperfections left behind. Being open, polite, and organised builds trust at a time when clarity matters most. 

It can also lead to a helpful reference for your next rental, as good tenants are often remembered for how well they left their previous homes. When possible, ask for written confirmation that the property meets expectations after your final review. This extra step ensures that all parties agree and gives you peace of mind long after the move.

Clean Thoroughly for a Lasting Impression

Repair and cleaning go hand in hand when preparing to move. A home can look neat on the surface, yet miss the sparkle that makes it inspection-ready. Kitchens and bathrooms, in particular, need detailed attention since these are the first areas landlords check. Wipe every surface, scrub tiles, and polish taps until they shine. Clean windows, vacuum corners, and dust light fixtures to lift the overall brightness of the space. 

Even a faint smell of fresh air can leave a better impression than the strongest scent spray. Don’t forget behind appliances, as hidden dust or crumbs can quickly undo hours of hard work. For those balancing work and moving, calling in qualified assistance can save precious time. Specialised tenancy cleaners understand what property owners expect and use powerful equipment that removes stubborn grime from ovens, tiles, and carpets. 

They can transform a home overnight, ensuring it looks spotless for inspection and helping secure the full return of your deposit. If you choose to clean on your own, start early and focus on high-impact areas. Finishing these sections first gives you momentum and keeps stress low in the final days before departure. 

Plan Ahead and Meet Your Lease Obligations

Organisation is the quiet key to a smooth move.  Begin several weeks before your notice period ends so you can repair, clean, and inspect without rushing. Even an hour per evening adds up to remarkable progress.

Revisit your tenancy agreement carefully. Some contracts list specific requirements such as carpet shampooing or professional window cleaning. Understanding these obligations early prevents last-minute surprises and unnecessary expenses. If anything is unclear, contact your letting agent or landlord directly rather than guessing. 

Clear communication protects both sides and allows you to focus on what truly matters—leaving the property in good order and closing this chapter with confidence. Creating a checklist can also help. Include everything from minor fixes to returning keys, and tick off each task as it’s completed. This small act brings a sense of calm control, making even the busiest moving week feel manageable. Another helpful step is to coordinate your utility accounts and change of address early. 

Not only does this prevent extra charges, but it also ensures that final readings and bills are accurate. Leaving your home in order, both physically and administratively, shows integrity and care that landlords always value.

Conclusion

Leaving a rental in good order is simply a matter of patience and care.  By fixing small faults and finishing with a thorough clean, you protect both your deposit and your reputation as a thoughtful tenant. A calm, organised farewell always sets the tone for a confident new beginning.

Read more